When it comes to electrical and electronic assemblies, the quality of your connections can make or break your system. Among the most widely used techniques is crimping connectors, a method of mechanically joining a conductor to a contact by compressing it with a crimping tool.
While soldering also has its place, crimping has become the industry standard in sectors like aerospace, defense, railways, and automotive thanks to its reliability and repeatability.
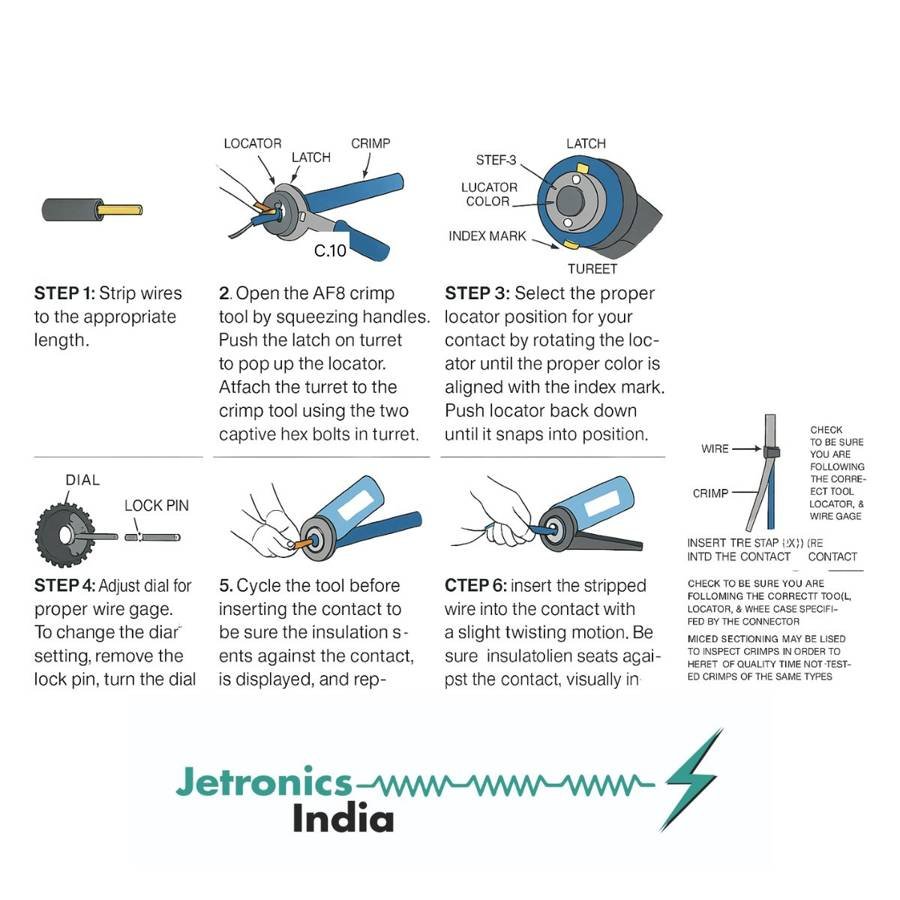
- The step-by-step process of crimping a connector.
- How to choose the right crimping tool.
- Why crimping vs soldering matters—along with pros and cons of each.
Step-by-Step: How to Crimp a Connector
Step 1: Strip the Wire
- Use a wire stripper to remove insulation from the conductor.
- The exposed length should match the connector manufacturer’s recommendation (too short leads to poor contact, too long risks short circuits).
Step 2: Select the Contact
- Choose the correct pin or socket contact for your connector series (for example, MIL-DTL-5015 or MIL-DTL-26482).
- Ensure the contact size matches the wire gauge.
Step 3: Prepare the Crimping Tool
- Install the correct locator and die set in your crimp tool.
- Adjust the tool setting based on wire gauge and contact specifications.
Step 4: Insert the Wire into the Contact
- Place the stripped conductor into the barrel of the contact.
- Make sure no stray strands are left outside the barrel.
Step 5: Perform the Crimp
- Insert the contact into the crimp tool and squeeze until the cycle is complete.
- A ratchet-style crimp tool ensures the process is fully completed before releasing.
Step 6: Inspect the Crimp
- Verify the crimp is firm and that the conductor is visible in the inspection hole (if provided).
- Conduct pull testing or visual checks to ensure quality.
Step 7: Insert the Crimped Contact into the Connector
- Push the contact into the connector insert until it clicks or locks in place.
- Tug lightly to confirm it is secure.
Choosing the Right Crimping Tool
Not all crimp tools are created equal. Using the wrong tool can result in unreliable connections, which can fail under vibration, temperature changes, or load.
Here’s what to consider when selecting a crimping tool for connectors:
- Compatibility: Ensure the tool matches the contact series (e.g., MIL-spec connectors often require qualified crimp tools like Daniels Manufacturing Corporation AF8, AFM8, etc.).
- Wire Gauge Range: Choose a tool that supports the wire sizes you commonly work with.
- Cycle Control: Ratchet tools or calibrated crimpers prevent partial crimps.
- Ergonomics: For repetitive work, a comfortable grip and lightweight build reduce fatigue.
Both crimping and soldering connectors are methods of attaching wires to contacts, but they work very differently.
Crimping
- Method: Mechanical deformation of the contact barrel around the wire.
- Strengths:
- Fast, repeatable, and scalable for production.
- Excellent vibration resistance.
- No heat involved, so insulation and components remain unaffected.
- Meets aerospace and defense reliability standards.
- Weaknesses:
- Requires specific tools and dies.
- Poor-quality crimps can be hard to detect without inspection.
Soldering
- Method: Wire is tinned and bonded to contact using molten solder.
- Strengths:
- Strong electrical conductivity if done correctly.
- Accessible tools (soldering iron, solder wire).
- Useful for quick repairs in the field.
- Weaknesses:
- Heat can damage insulation and nearby components.
- More prone to cracking under vibration.
- Operator-dependent, harder to achieve consistency in mass production.
Bottom line: Crimping is the industry standard for mission-critical connections, while soldering is often used for low-volume work or field repairs.
Crimping connectors may seem like a small step in a big system, but it is a crucial one that determines the structural integrity and reliability of the connection.
At Jetronics India, we believe in not just supplying connectors but also empowering engineers and technicians with the knowledge to use them effectively. Please feel free to contact us